

How To Create Thumbnails On Photoshop
- Mac and Windows: ] / (larger).
I used the hardest setting of the Eraser tool for around his hand and the metal edges of the brush. I turned down the hardness of the Eraser when cleaning up the ends of the paintbrush.
Once I cleaned up the paintbrush and hand, I rearranged the layers so that the Bob Ross layer is at the bottom, the screenshot is in the middle, and the hand we just cleaned up is on top. Now, once all of the layers are visible, I have Bob Ross's hand in front of the canvas. I took these same steps when I copied his hair and shirt, using a sharp-edged Eraser for his shirt and a very soft-edged Eraser for his hair.
Then, I moved the layers I created and cleaned up to the very top. Now, I have a picture of Bob Ross 'painting' my Photoshop canvas.
How to use the Opacity and Color Balance tools in Photoshop
As stated before, I needed to use a photo of my face that was the same perspective as Bob Ross'. In the photo I chose, I am basically facing the camera head-on and my face is angled the same way.
To select my face, I once again used the Lasso tool, though this time I justed used the regular Lasso tool since it doesn't need to be quite as precise; it is easier to erase away unneeded parts later than realize you didn't quite get everything you needed.

I chose a picture of my face that was similar to the direction Bob Ross was facing and the angle of his face. Then, I used the Lasso tool to select my face, and copied and pasted into the project.
I copied and pasted my face into the workspace, used the Move Tool to place my face over Bob Ross' face, and placed it at the top of the Layer list so it was in the foreground. To ensure my face is the same size and angle, and that my facial features line up with his as much as possible, I selected the Layer with my face and turned down the opacity just enough to see through to his facial features.
While still in this mode, I used a soft-edged Eraser to erase any part of my face that I won't need.
After returning the Layer's opacity back up to 100%, I saw that my skin tone is just a little bit different than Bob Ross', most likely because his picture was taken with studio lighting inside and the photo of me was taken outside. To adjust the color balance, I selected Image from the menu at the top: Image>Adjustments > Color Balance.
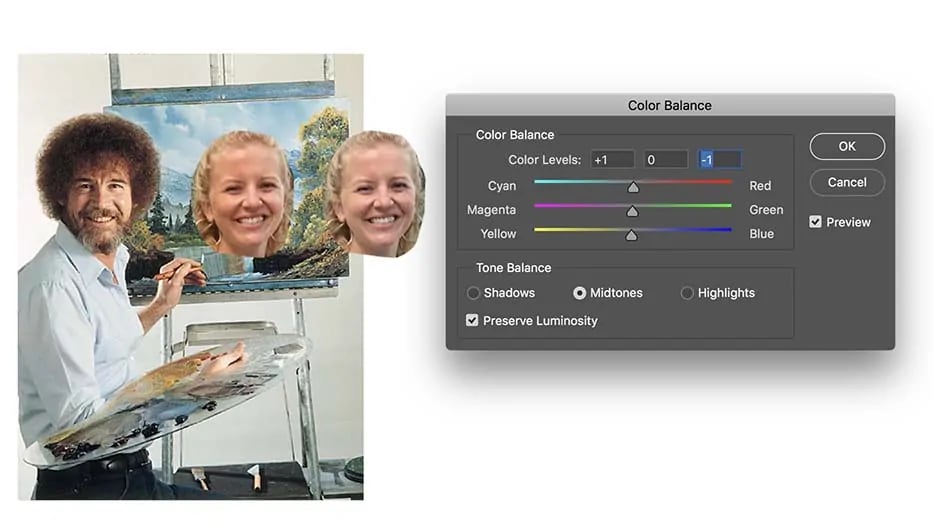
As a comparison, I have here Boss Ross, my face that I edited using Color Balance, and an original copy of my face.
There are three sliding scales you can adjust: Cyan/Red, Magenta/Green, and Yellow/Blue. You can decide whether you're manipulating the Shadows, Midtones, or Highlights, but I typically just manipulate Midtones. Bob Ross' face has slightly more yellow and red tones to it, so I increased the Yellow and Red on my face to match.
Now, making it look more realistic is just a matter of using the tools I've just described above.
To get Bob Ross' hair to cover my forehead and sides of my face, I simply Lassoed his hair from the Bob Ross Layer, copied and pasted it to create a new layer, and then used a soft-edged Eraser to clean up the edges. I used a hard-edged Eraser to clean up the collar of his shirt and simply kept Erasing and adjusting the color balance as I saw fit.
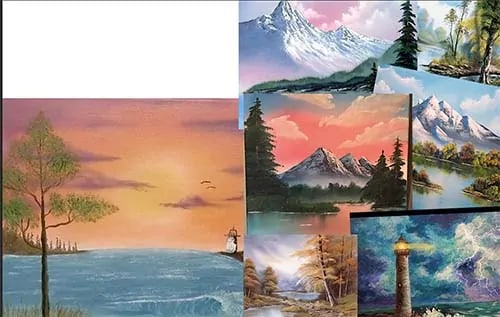
Filling in the negative space and adding color
To fill the negative space, I Googled 'Bob Ross paintings,' copied and pasted them into the project (each creating its own Layer), and then rearranged and sized them how I liked. As you can see, I chose paintings with colors that mostly steered clear of YouTube's colors, yet that would contrast with the green title layer I created for Ezoic Explains.
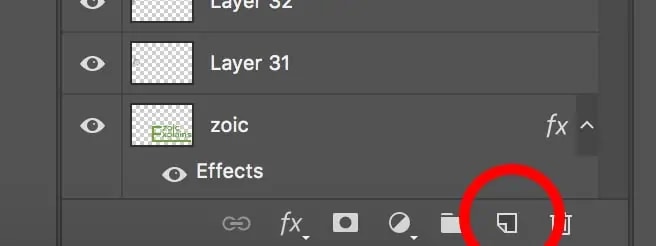
The last addition I made to this project is an overlay Layer to make the negative space directly behind Bob Ross a different color than white since YouTube is primarily white. To do this, I created a new Layer by navigating to my Layers and selecting the New Layer icon in the toolbar at the bottom of the Layer List, which looks like a piece of paper with its corner folded.
While the new Layer is selected, I clicked the Shape Tool, located roughly three icons from the bottom of the toolbar vertical toolbar. By holding down the icon, a list of various shapes will dropdown. For this project, I used the Rectangle Tool.
You can make a perfect square or circle by holding down Shift while you click and drag to create a shape. Once the shape is made, you can edit the Fill and Stroke through adjustments in the horizontal toolbar at the top.
Fill: what color is filled in the middle of the shape (can be transparent)
Stroke: what color the shape is outlined in (also can be transparent)
Stroke Density: how thick the outline is (measured in px)
I used purple for the Fill and did not include a Stroke. Then, I moved the purple rectangle Layer to the very top of the Layer List and changed its Opacity to about 40% so I could see through it. I used both soft and hard-edged Erasers to reveal me/Bob Ross, the easel, and canvas. To eliminate the purple overlay from the paintings on the right-hand side, I used the Rectangular Marquee tool to select the section of purple I wanted to eliminate and then used the Eraser.
With the Marquee Tool, any tool you use will only happen within the confines of the dashing lines, thus the Eraser tool only allowed me to Erase the purple I selected over the paintings.
Now, the white space behind me/Bob Ross has a purple overlay while the paintings and Ezoic Explains title are as they originally were.
What size and file type should a custom YouTube thumbnail be saved as?
A YouTube thumbnail can only be 2MB or smaller, so you will want to make sure the image size, format, and quality caters to those requirements.
First, always save the file as a Photoshop file (PSD) by clicking File > Save As to keep a copy of the project in this format because a PSD file will keep all of the Layers available in case you want to go back and fix or update something.
After saving it as a PSD file, save it as a JPEG. JPEGs take up less space than PNGs, though it has some restrictions that more advanced projects might find limiting.
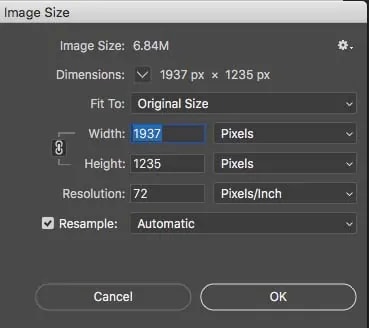
As I stated earlier, I always begin my projects larger and then scale them down as necessary, which I will definitely need to do in this instance. To change the image size, navigate to Image>Image Size. I usually first reduce the pixels to 72 ppi and change the width size to 1000px.
The height should be locked to the width so proportions stay consistent, indicated by two lines comes out of a chainlink and leading to the Width and Height. If the lines are not there, click the chainlink and the dimensions will lock.
After you click Save, a window will pop up asking what quality you would like the image. For a YouTube thumbnail, mid-range or a little lower will suffice; this will help with file size as well.
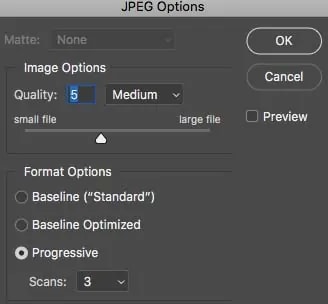
Before uploading the file as my YouTube thumbnail, I double-check that the file is below 2MB. If it is still over, I just keep resizing the thumbnail and adjusting the quality until it is 2MB or less.
Stay consistent and engaging with YouTube thumbnails
Your YouTube thumbnail is like the items in a shop window–its meant to grab users' attention and entice them 'into the store.' I suggest finding a specific 'look' for your thumbnails that you stick with so that your branding stays consistent. This makes it easy for users to become familiar with your thumbnails and easily spot one of your videos amongst others.
Basic composition principles and Photoshop tools have a bit of a learning curve but once you have practice thinking like a designer and using the tools and shortcuts, making thumbnails and other design projects will become much easier. After mastering these concepts and tools, there is much more you can learn about design and Photoshop to continue tweaking and improving your thumbnails.
If you don't have access to Photoshop, Adobe provides a week-long free trial of its products if you would like to try before you buy.
If you've already used your trial or are not interested in purchasing Photoshop, I would research online tools that function similarly to Photoshop and then use the aforementioned design principles and information to knowledgeably create your thumbnail.
Questions. Leave them below and I'll offer any guidance I can.


How To Create Thumbnails On Photoshop
Source: https://www.ezoic.com/how-to-create-an-eye-catching-youtube-thumbnail-in-photoshop/
Posted by: jenkinswassely.blogspot.com
0 Response to "How To Create Thumbnails On Photoshop"
Post a Comment